

I have been playing with making my own shrinky dinks from recycled plastic packaging.
#6 clear plastic works the best - I tried #1 and that just went all rubbery and milky. I'm not the first to come up with this technique so I'll list a few places I found that inspired me at the end of this post.
On to to the tutorial! First, gather your materials.
Scissors, #6 plastic container washed and stickers removed (I use rubbing alcohol to get the adhesive off) fine tip permanent marker, fine grit sand paper, colored pencils, and a heat gun or an embossing gun.
Step 1: Cut out the tops and bottoms of the plastic containers to get nice flat pieces of plastic. I found that the sides warped alot, so I don't recommend using them. Step 2: Draw your design on the plastic with the permanent marker. I just traced a design from a clip art book. Remember that your design will shrink down to about 25% to 50% of it's original size. (I'm not sure how much smaller really - but basically it shrinks alot) So keep the design simple.
 Step 3: Sand the back of your image. I sand in one direction and then perpendicular to that and so on like cross-hatching. You are trying to put little teeth on the plastic for the colored pencil to grab onto but you don't want any one direction of lines to stand out. The concept is similar to the traditional printmaking technique of mezzotint.
  Step 4: Color the sanded side of the plastic with colored pencil. I like to start light and build up layers. The image to the right is looking at the front of the piece.
 View of the back of the piece after it is completely colored in.
Step 5: trim out your design and punch holes if you want to sew it or hag it from something. I used a 3/16 punch and it resulted in holes just big enough for an embroidery needle or thin wire to pass through. Step 6: Start shrinking! Do this on a surface that won't be damaged by the heat of the heat gun - so not on your cutting mat! I lightly held my piece with a pair of pliers with insulated handles. You could also use a wooden skewer.
Be sure to not grip or hold it down too hard. You can damage and warp the plastic while it is soft. Oh no, it's all curled up and weird looking!
 No problem - it does that.
Just keep the heat gun moving around to keep the heat even over the entire piece. Once it gets pretty flat again you have shrinked it as much as you can. My pieces were all still a little warped so I put something flat on top until they cooled and that seemed to work well. step 7: Seal the front and back. I used a gloss varnish for oil paint. But whatever you use, test it first to make sure it won't dissolve or smudge the pencil or permanent marker.
The plastic has little scratches & bumps and isn't perfect and smooth like store bought shrink plastic, but I think this just adds to the character of your creation.
A few other places with great tutorials for this technique:
Curbly.com DIY Shrinky Dinks
Etsy How to video
Poopscape
How to Make Plastic Shrink Charms from Recycled Plastic
Saturday, November 15, 2008
The Octopus Project
Tuesday, February 20, 2007

On Sunday night I saw a fabulous band, The Octopus Project, at the Chop Suey in Seattle. They have been described as "ambidextrous equipment failure junk-tronica" which is just a perfect bit poetry.
Their show is a multimedia event and spectacle. I really love that they wear matching outfits, show videos, dress up their speakers like ghosts in addition to playing great music. They have put alot of effort into their show - which I really love in a band. Did I mention how much I just love that?
Live shot taken by Vanessa - see her entire set from the show. Here's another photographer who was there and captured some great images that incorporate the videos and the band in a striking way.
What's more their merch table was amazing! They had this great 3 dimensional lighted display and along with the typical CD's, T-shirts, and buttons they sold plushies made by band member Yvonne and posters with felt elements sewn onto them! All of which is also available at their website. Speaking of poetry, be sure to notice the lovely descriptions for each of the items in their merch section.
Of course, once I found out they were from Austin, Texas it all made perfect sense given that Austin is the Indie DIY Craftacular capitol of the world.
So how do you end an inspiring evening of music and craft? By having your car break down 45 minutes from home and having to call your mom at 2 am in the morning to come and get you. I love my mom.
Paper Tart
Sunday, July 16, 2006
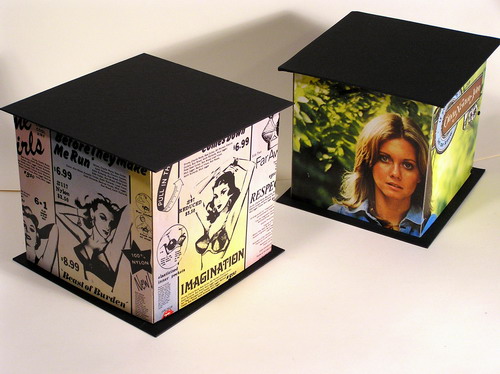
2 boxes I made using Record covers.
Olivia Newton John and The Rolling Stones were my sacrifices for this project.
They are about 6 inches square.
More to come.
